It's always exciting when you find a new nail art technique to experiment and try out. The fashion world has gone crazy with everything ombre over the past two years and if your not sure whether or not to try ombre hair, ombre nails are a much quicker, reversible solution for all your ombre needs!
This effect can take a while to perfect and I am still trying to perfect it myself, so my finished result may not look as amazing as it can do, but it shows that this can be a difficult technique to master. Anyhow, like with other nail effects, you can use pretty much any colour that you want and a contrast between the two colours can make it look really effective.
 |
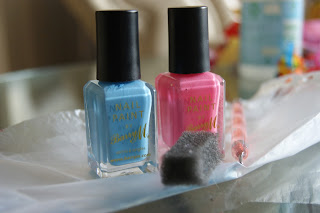
| Items needed to create the ombre nail effect |
For this tutorial you will need:
- A base colour
- A different colour to create the ombre effect with
- A small sponge, slightly larger than the size of your nail
- A plastic sheet or poly-pocket
- Something to mix the two colours together such as a toothpick or nail art tool
- Base/Top coat (optional)
 |
| Barry M Nail Paint in Blueberry |
 |
| Step 1 |
1. Firstly you need to apply a decent base coat, especially if you are using nail polishes which are likely to stain your nails. Once this is dry, you need to apply a base colour to your nails. For this tutorial I am using the Barry M nail paint in 'Blueberry.'
 |
| Step 2 |
2. Next, on the sheet of plastic you need to paint a thick layer of the base nail polish onto one side of the sheet. Then next to it as close as possible without allowing the two nail polishes to touch, you need to apply a thick layer of nail polish which will be used to make the ombre effect, as shown above. The nail polish which I am using for the ombre effect is Barry M nail paint in 'Bright Pink.' You will need to make sure that the combined nail polish is the length of your nails to ensure that your nails will be covered effectively.
 |
| Step 3 |
3. Before the nail polish has time to dry you then take your toothpick or nail art tool and gently mix the two colours together in the middle so you are left with one colour on the left, the mixture of colours in the middle and the other colour on the right. This creates the ombre effect on your nails.
 |
| Step 4 |
4. Next, you need to take the sponge and put it into the nail polish mixture. At this stage you should have the base colour at the bottom of the sponge, and the ombre colour at the top, with the mixture of the two colours in the middle. This is shown below. You will need to work quite quickly to ensure that the nail polish doesn't dry.
 |
| Step 5 |
5. Once the sponge has been dipped into the mixture, you then press it onto the nail. You need to ensure the top of the sponge is applied to the top of the nail in order to create the ombre effect. You will find at this stage the nails will look rather messy because of the sponge but this will be cleared up later in the tutorial. Repeat this stage until all your nails have been painted, which may mean you might need to apply more nail polish to the plastic sheet.
 |
| Step 6 |
6. Once you have applied the sponge to all of your nails it is important to allow the nail polish to dry. When you are satisfied that it is dry, take a cotton bud and dip it into nail polish remover. Then use the cotton bud to clean up any nail polish which has got onto your cuticles or skin and you have successfully created the ombre nail effect. Using the sponge gives a textured finish, and you can alter the amount of ombre by the amount that you mix the two colours together. At this stage you can also apply a top coat if desired.


No comments:
Post a Comment